Sync Project
This site was created for our work in the Embedded Systems Workshop course given in Tel-Aviv University on 2010 by Sivan Toledo. We describe our project called Sync in detail and mention our earlier Time Lapse Camera project.
Idea
The project implements a basic Dropbox synchronization mechanism. Connect a flash-drive to the board and it will upload it to a configured Dropbox account. We provide a web interface for configuring the Dropbox account's user and password. Also, when a flash-drive is connected, we offer a web interface for viewing and accessing files on the drive.
Hardware
We implemented our project using the following pieces of hardware:
- NXP LPC1768 based mbed board
- mbed LPC1768 Workshop Development Board (from Cool Components)
- Flash-drive
Implementation
Our implementation was based on three main modules in charge of the different aspects of the project:
- Dropbox uploading service
- HTTP Configuration server
- HTTP Flash-drive browser
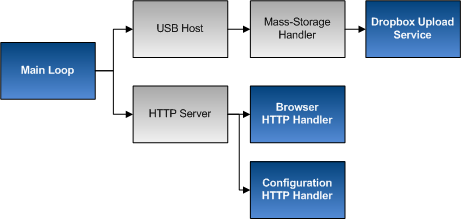
The grayed boxes represent existing components we used. See full list of external components we used.
Main Loop
The following diagram describes the basic flow of the main loop:
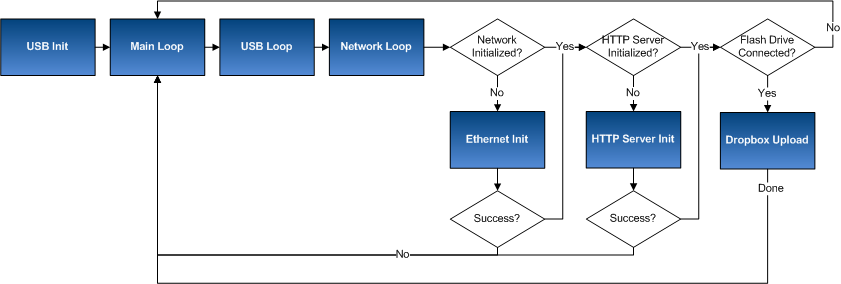
The program's entry-point first initializes the USB interface and then proceeds into an infinite loop that controls configuration, gives the USB and network interface time to run and uploads files to Dropbox when needed. The configuration steps check to see if the component has already been initialized and if not it will attempt to initialize it. In case a network cable isn't connected or we're unable to get an IP, the network initialization will fail and retry by restarting the main loop. In case we passed the network initialization and received an IP, we will attempt to start the HTTP server by binding to port 80 and registering our handlers (configuration and flash-driver browser). Once both the network interface and HTTP server have been initialized, we wait for a USB flash-drive to connect. When a flash-drive is connected, the USB-Host module signals us by calling our OnDiskInsert function. This function sets a simple flag that lets the main loop know we are ready for the Dropbox upload. Once the flash-drive is connected, the synchronization starts. When the synchronization ends, a log-file on the flash-drive is updated.
During the different processes we control the three LED's on the device in the following manner:
- LED #1 Constant: A USB flash-drive has been connected and a Dropbox upload is starting.
- LED #1 Blinking: Files are being transferred from the flash-drive to Dropbox.
- LED #2 Constant: Dropbox upload finished successfully.
- LED #3 Constant: An error has occurred.
Dropbox Upload
Dropbox offers a public API for accessing and controlling a Dropbox account's files.
We registered a Dropbox app named "SadnaEmb" (which isn't publicly listed) for the purpose of this workshop. The app provides a key and a secret that are needed for accessing the API.
Dropbox implemented the OAuth standard for authorization which we needed to support for our different requests.
We implemented a subset of the OAuth standard in order to get the specific functionality we needed from Dropbox.
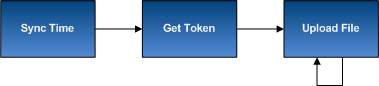
- Synchronize Time: Dropbox requests require an accurate timestamp. We acquired these timestamps by synchronizing the controller's time to a NTP server using a basic NTP client.
- Get Token: Each upload request requires the Dropbox app key and secret (which is hard-coded to our Dropbox app's details) and user key and secret. The user key and secret are obtained by sending the user's credentials to Dropbox which returns the key and secret after authorizing the user. The user's key and secret are used in all the following upload requests to Dropbox.
- Upload File: The upload request uses the obtained tokens to sign the request and sends the file's data using multipart http encoding.
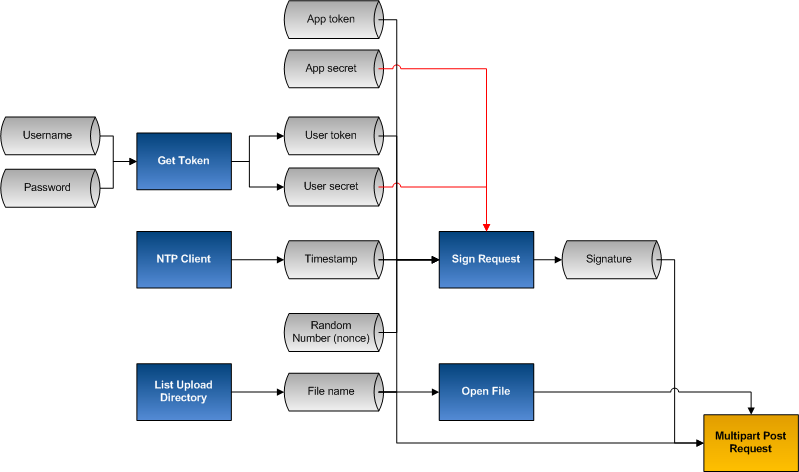
- 1. App token and secret are hard-coded (per Dropbox app)
- 2. Random number (nonce) is generated
- 3. User token and secret are obtained using Dropbox API (given username and password from configuration file)
- 4. Obtain current timestamp using NTP client
- 5. File name is supplied to Dropbox API from listing the upload directory in the flash-drive
- 6. All these request parameters are signed using the concatenation of the app secret and token secret
- 7. The signature is base64 encoded and attached to the request
- 8. The file's contents are sent using a multipart POST request
HTTP Configuration Server
This module provides the functionality for configuring the synchronization's parameters, mainly setting Dropbox's authorization details. We decided to store the authorization data in a file (DBSet.txt) on the flash-drive, that way the synchronization is user-independent. There is a web-based GUI for altering the password and username (editing DBSet.txt). It's implemented by a custom HttpHandler, which manages the web-pages and flash-disk IO both. In the future this module can be extended for setting additional parameters like synchronization mask, traffic chunk size, etc. In order to access the settings web-page, you need to browse to mbed.ip/Setup* in your web-browser, or alternatively browse to mbed.ip*, and click the "Setup" link.
HTTP Flash-drive Browser
This module introduces a simple web-based GUI for browsing the contents of the flash disk. Browse to mbed.ip/Root/ to see the contents of the root folder, or mbed.ip/Root/SpecificPath*, while SpecificPath is a back-slashed path of some directory or file on the flash-drive. Each directory or file presented is a link to its content. This module also provides a simple textual viewer for file contents, just by browsing to the file. This implementation is also based on a custom HttpHandler. In the future this module can be extended for viewing more complex contents like pictures, media, etc, and file/directory details. Also, content-editing can be added. This module with some improvements can be used as a standalone application, providing the ability, quickly browsing/editing some flash disk, from any computer in the network with simple web GUI (the alternative nowadays are routers with USB slots). Both modules share a Welcome Page that can be accessed by browsing to mbed.ip* directly. *mbed.ip is an ip address assigned to the mbed card.
External Modules
- USBHostShell: A lightweight USB host with simple Mass-Storage device support
- HTTPClient & HTTPServer: Provides HTTP client & server API's
- NTPClient: Simple NTP client for synchronizing controller's time
- CyaSSL: A lightweight SSL library used for its HMAC hashing capabilities
Problems Encountered
- Web-based compiler: mbed offers a simple online code editor and compiler which we used throughout the project mostly successfully. However, as time went by the online interface proved frustrating. The idea of online coding made simple tasks like collaborative programming, version control and downloading new bin files to the controller more complicated and time consuming. At one point we decided to setup a local compiler and editor, but we soon realized the supplied mbed libraries (which we needed) will not work using a local development process.
- Connections and Disconnections: We encountered problems trying to get the controller to recognize disconnections and reconnections of a flash-drive. We discovered that the underlying USB host we were using wasn't handling these situations correctly.
- Dropbox Debugging: The Dropbox API is pretty strict and requires a specific authorization method which proved to be very hard to debug on the controller. We developed a simple C# prototype to get the API working and then ported the code to the controller. This proved to be relatively effective but there were still some specific issues we encountered when working with the controller. Unfortunately, Dropbox's errors weren't very informative and required a lot of guesswork.
Future Improvements
- RTOS: Our design has a clear separation of modules (Dropbox, and the two HTTP handlers) that would fit nicely into three separate processes leading to a cleaner design.
- Handle disconnections and reconnections: Requires fixing the underlying USB host but is essential for a real-life embedded application.
- SMTP Mail: Implement a simple SMTP client for sending email directly from the controller.
- SSL Support: Implement a HTTP client over SSL for a secure connection with Dropbox.
- Real Synchronization: We currently provide a simple uploading of a directory. A more complete solution should offer real synchronization including downloading files and comparing modified dates.
Source Code
The source code can be viewed and downloaded from the mbed.org page.
Time Lapse Project
Idea
The project idea was to create a simple time lapse camera that takes pictures every fixed interval and save them to a flash-drive/sd-card. The pictures would later be taken offline to create a time lapse video (as seen here).
Our Work Process
Our implementation was based on creating a webcam driver that would be used by the controller's USB host capabilities.
This driver would grab a frame from the webcam at fixed intervals and save it to some external storage.
When considering how to implement a driver for a webcam, we considered the two following options:
Create a driver based on some old standard, as seen here,
or create a driver based on the USB standard, UVC (USB Video Device Class).
Eventually we decided to go for the UVC standard and obtained a Logitech webcam which (unofficially) supports the standard.
We searched the UVC standard for options to obtain a single frame from the webcam and came up with the following options:
- Request a single frame using the VS_STILL_IMAGE_TRIGGER_CONTROL control selector. The request generates a frame that could be sent either by a bulk transfer or an isochronous one (depending on the device). This option seemed like a perfect match for what we were looking for, but as it turns out there were very few examples of implementations and even fewer cameras that seemed to support this feature.
- Capture a single frame from the continuous stream of frames sent by the webcam. We figured every camera will support this core functionality of streaming images, and we can select a single frame out of the stream.
We chose the second option. Each webcam may support streaming of frames over a bulk or isochronous transfers. As it turned out our camera supported the isochronous method only and it seemed this was the popular choice (we haven't found a single documented camera that supports frame streaming over bulk transfers).
We used existing drivers as a reference for our UVC driver and started off by trying to control and configure our webcam using the UVC standard control interface. This phase was relatively successful and we were able to send configuration command and query the parameters to verify we were doing things correctly.
After confirming it was possible to control the webcam, we started the process of obtaining a single frame from the isochronous interface. At this point we discovered that the USB host module we were working with hadn't implemented isochronous transfers. We attempted to add simple isochronous support based on the OHCI standard which we discovered that our controller implements. We read up on isochronous endpoint descriptors and what makes isochronous transfers special. We spent long hours trying to get things to work, but we weren't successful. Eventually we tried a different approach based on the similarity between interrupt transfers and isochronous transfers where we managed to successfully receive the header of a frame in an interrupt transfer. This proved to us that we successfully configured our webcam to stream frames, but were unable to setup the isochronous transfer handling to receive them.
We came to the conclusion that the way things are going, we won't be able to finish our project on time. It was a hard decision but we decided we rather spend our time getting an interesting, fun project to work than spending them implementing a small subset of the USB standard in our USB host module. Our decision has led us to search for new ideas, and the one we picked was the Sync Project above.
Source Code
The source code can be viewed and downloaded from the mbed.org page (Coming soon!).