Simon Says, Run Java on the CC2650
Submitted by Roy Sheffer, as part of the Advanced Computer Systems course
Abstract
The CC2650 is a wireless MCU with Bluetooth, ZigBee and 6LoWPAN capabilities. The micro-controller can be programmed in c/c++ and has libc and hardware interfaces implemented in the TI-RTOS kernel. The goal of this project is to enable quick, safe programming to the CC2650 without the usual learning curve of hardware programming, while supplying the hardware interfaces needed in order to implement a complex product. This was done by porting a JVM to the micro-controller and implementing the major hardware interfaces and base libraries in java. The final product of this project provides users with the ability to write embedded programs that interface with the UART, flash, buttons, and GPIO peripherals with the ease that comes with writing object-oriented java with garbage collection, threads and exceptions. By using the CC2650 LAUNCHXL which supplements the CC2650 with 1MB of SPI NOR flash, the code size available increases from 128K of native code to 1MB of java classes which can be deployed over UART without needing to reprogram the MCU program memory which contains the JVM.
Background
-
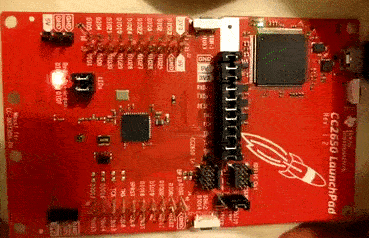
CC2650
The CC2650 is a wireless MCU with Bluetooth, ZigBee and 6LoWPAN capabilities and is based on an 32-but ARM Cortex-M3 processor running at up to 48 MHz. The CC2650 LAUNCHXL used in the course supplements the CC2650 with 2 LEDS, 2 buttons, GPIO, I2C, and SPI interface ports, 1MB of SPI NOR Flash, UART over a micro-usb connection and programming and debugging with the CCS Studio IDE. The TI-RTOS kernel supplies peripheral, scheduling and libc APIs for the MCU which has 128Kb of programmable flash for code and 20Kb of RAM.
-
uJ
uJ is an open source Java VM for microcontrollers (uJ Home Page) written entirely in C. It implements the entirety of the java bytecode, has its own heap and garbage collector, and supports exceptions, threading and synchronization. The vm requires ~50kb of code space and needs a few hundred bytes of RAM to run, the rest being used as the jvm heap. Hardware interfacing is done by implementing "native" java classes: Java classes with empty function implementations which are implemented in C as part of the JVM port.
Motivation
Learning to program microcontrollers usually has a steep learning curve because of the need to learn memory management, power management and peripherals without the convenience of high level programming languages which supply garbage collection, object oriented programming, threads and exceptions. uJ helps bridge the gap by enabling us to run java on microcontrollers and implement embedded and IOT projects quickly and easily. This project brings these advantages to the CC2650 (and easily to all TI MCUs which are supported by TI-RTOS)
Challenges
As part of our goal to port uJ to the CC2650, the three major challenges in this project where compiling uJ to the CC2650, finding where to place the compiled java classes, and implementing java classes that interface with the launchpad peripherals.
-
Compiling the JVM
The uJ code needs to be compiled as part of a CCS Studio project and run from the context of a TI-RTOS task. This requires adapting the uJ code to the CC2650 compiler and environment.
-
Java Class Placement
Java programs are composed of a java class file (one for every java class) which contain java byte code and are run by the jvm. These java class files need to be stored somewhere in order to be run by the jvm. The CC2650 has only 128Kb of programmable code flash of which half is already in use by the jvm. Also, programming the code flash requires recompiling and flashing the jvm, making the code flash an insuitable place for storing the java class files. The solution used in this project is storing the java class files in the 1Mb of SPI flash that can be found in the CC2650 LAUNCHXL board. This flash cannot be programmed externally, meaning that the flash is programmed by a flash programmer, that recieves the data to flash over UART, also included in this project.
-
Hardware Interfaces
Porting uJ has no value if the java code run on the MCU cannot manipulate the various hardware peripherals. The CC2650 hardware peripherals need to be wrapped with "native" java classes as well as normal java class wrappers that supply extended functionality and encapsulation. This port contains classes that allow control of UART, SPI flash, GPIO (and more specifically the LEDs) and buttons.
Project Description
The uJ JVM was successfully compiled for the CC2650 with full support for all data types (double, float, long), exceptions, threading and synchronization. The jvm heap size available on the MCU is 12Kb and the jvm manages about 2500 java operations per second. The following java framework libraries were implemented partially:
Random
ArrayList
Math
Integer
String
Thread
-
Gpio
The java Gpio class can be used to get / set and toggle the state of the CC2650 GPIO pins.
-
LEDs
The LED class uses the Gpio class in order to control the CC2650 LAUNCHXL red and green LEDs.
-
Buttons
The Button class enables programmers to wait and react to button presses on the CC2650 LAUNCHXL synchronously.
-
Flash
The last 64Kb of SPI flash are set aside for persistent program memory and can be read or written using the Flash class. This enables programs to save their state even when the MCU is restarted.
-
UART
Java code can write to the UART port by using the supplied
consolePut(...)orString.print(...)functions. -
Power
The CC2650 is meant to be used as a low power MCU which can run for long periods on battery power alone. While running, the jvm is constantly executing opcodes rather then being event driven, and is therefore not very power efficient. For exactly this reason the java
deepSleep(...)function which natively sleeps without interruption (all threads of the jvm stop running) is supplied.
Before running the jvm, java class files are placed one after the other in the SPI Flash of the LAUNCHXL, giving us almost 1Mb of memory for our code (in the case where there is no such flash, the code can be placed on any other read-only memory or as part of the program memory). The SPI Flash on the LAUNCHXL can only be programmed by code running on the MCU, creating the need for the flashprog project supplied in the source code. This project, which is compiled and flashed to the CC2650, receives data from the UART port and writes it to the SPI Flash, enabling us to write java classes over the UART port and then run them on the MCU. The final version of the jvm waits for commands over UART when started and can either run the existing class files, or receive java classes over UART, write them to the SPI Flash and then run them. All of this is managed by a python script which concatenates the java class files and sends them over UART to the MCU.
Example Application - Simon
The game of Simon was chosen in order to showcase the features, strength and ease of development that comes with running the jvm on our MCU. The game was developed and compiled entirely in the eclipse IDE for java and utilizes all the managed and native utilities described in the previous sections.
Gameplay
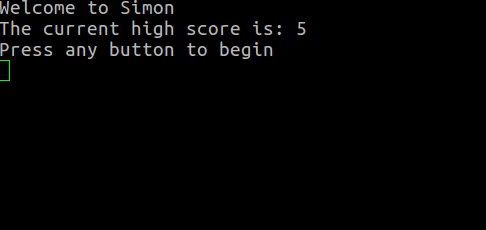
Initial Prompt
The game starts by flashing both the red and green LEDs and welcoming the player as well as showing the previous high score (which is saved in the SPI Flash). The game starts when one of the buttons is pressed.

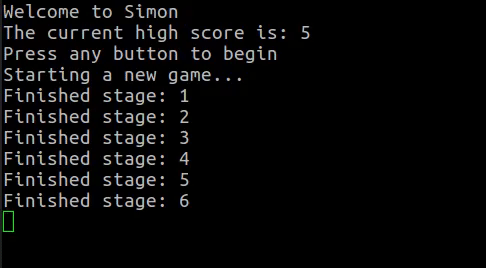
Simon Says
The pattern to follow is displayed by the LEDs on the board and the player needs to repeat the same pattern by pressing the buttons. The level is raised every time the pattern is successfully repeated, which the board signals by turning on both LEDs. The pattern becomes longer and is displayed faster after every level.
Game Over
When the pattern is repeated incorrectly, the game ends (signalled by the red LED) and then starts from the beginning. If a new high score is achieved, it is saved in the SPI Flash.
Src
All sources and usage for this project can be found in the following git repo.
License
The original code and license can be found here.